2012年10月18日 星期四

如何美化網頁文字(11)-[ul][li][dt][dd]項目分類


文章中,總是要列出一些要點、清單,讓文章使人更能表達作者要表達的大綱,所以橙子要來說明有3個列表清單方式供大家使用!
列表清單包含有3種:
   1.無序清單-ul:意思為沒有序號別,前面是圓形(預設)、方形、菱形...等,各種形狀做分別
   2.有序編號清單-ol:以序列碼分別之。
   3.定義清單-dl:前無序號或圖形,是以自動縮排分別排列。

子項目標籤有
   1.清單項目-li
   2.定義項目-dt
   3.定義說明-dd
來寫個程式說明吧!
<!doctype html>
<html>
<head>
<meta charset="utf-8">
<title>魚和橙的結合</title>
</head>

<body>
<h1>How to use list -魚和橙的結合</h1>
<h2>Use (ul)</h2>
<ul>
  <li>Round Round Round</li>
  <li>Square Square Square</li>
  <li>Triangle Triangle Triangle</li>
  <li>Diamond Diamond Diamond</li>
</ul>
<h2>Use (ol)</h2>
<ol>
  <li>one one one</li>
  <li>two two two</li>
  <li>three three three</li>
  <li>four four four</li>
</ol>
<h2>Use (dl)</h2>
<dl>
  <dt>Round Round Round</dt>
  <dd>one one one</dd>
  <dt>Square Square Square</dt>
  <dd>two two two</dd>
  <dt>Triangle Triangle Triangle</dt>
  <dd>three three three</dd>
  <dt>Diamond Diamond Diamond</dt>
  <dd>four four four</dd>
</dl>
</body>
</html>
 
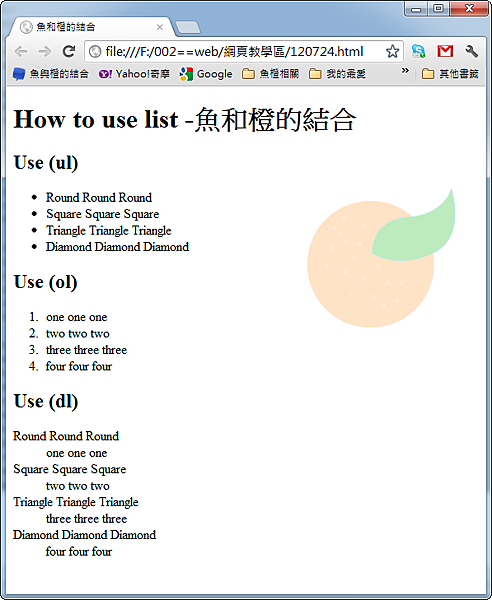
 執行結果:
2012-07-24_173940      
各位可以照著程式的寫法,就可以得以上的結果,就可以了解使用的方法,還有ul的圓形要如何改呢?其實就要利用css來更動就可以!
由下次來說明如何改動吧!另外再說明如何改變ol 的號碼順序。
結果,可以利用以上的方式,就可以讓你的文字、文章 更有分類更清楚了!

如何美化網頁文字(13)-[@font-face]加入自己想要文字字型


0000標題024

在以前,網頁中的文字只能選擇特定的字型,特別是中文,大致上只有標楷體和細明體及新細明體可用,其他的字型皆不能使用,主要原因是網頁顯示文字,是要看客戶端的系統中是否有該字型檔案,如果沒有該字型檔案,其字型就會顯示內定的字體;所以當你設很多的字型設計網頁,而在自己的電腦上都顯示無誤,自己正高興設計正好,到了其他的電腦上,卻無法顯示你所設定的字體,當然就無法想要用宇體表現你網頁所想表達的美感和事情。
現在CSS3 解決了該問題,其實就是在伺服器放上字體檔案,讓使用者在使用時,可以一併顯示在網頁上,就解決了顯示字型的問題。
不過,當你在載入字體的時候,也可能要考慮字體的版權問題,有時並非是你可公布的字體,這可是要注意一下!以下的範例,不會顯示字體檔的名字,僅以 XXX YYY 代替,請見諒!
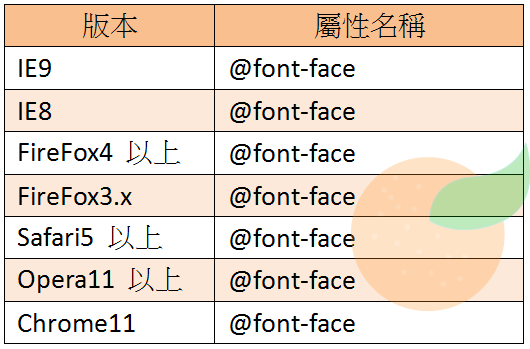
現在有了CSS 3 當然還是有相容性的問題,我列表了一下!
2012-10-18_120007
再來我們寫個HTML 吧!
<!doctype html>
<html>
<head>
<meta charset="utf-8">
<title>魚和橙</title>
</head>
<body>
<h1>FONT INSIDE @font-face</h1>
<p>The results of a survey <strong>keyword</strong> Friday showed <span>that 70 percent</span> of local <em>salaried employees</em> are hesitant(1) about getting married, citing insufficient(2) savings and job instability as the reasons.魚 橙</p>
</body>
</html>
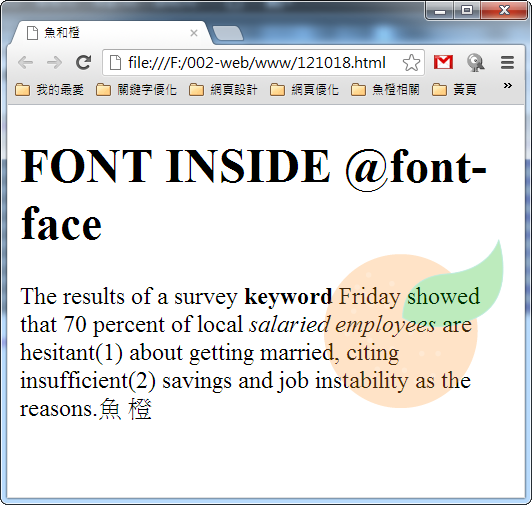
 先看輸出如何!
2012-10-18_121442    
輸出皆是預設的字體字型,再來我們加入CSS3 來改變字體吧!
首先我們將我們要的字體XXX001.TFF 及 YYY0002.TTF 檔存入,建立一個FONT 的目錄!再來開始寫CSS 
<style type="text/css">
@font-face {
    font-family: XXX;
    src: url(font/XXX001.ttf);
}
@font-face {
    font-family: YYY;
    src: url(font/YYY001.ttf);
}
h1 {
    font-family: XXX;
}
p {
    font-family: YYY;
}
</style>
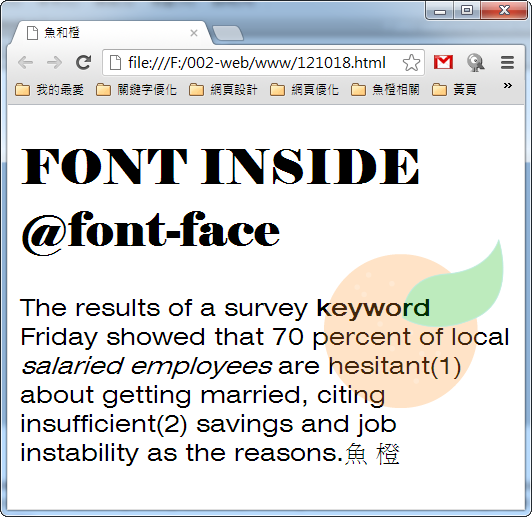
 加入了CSS,我們把font-family 設名稱為 xxx ,取資料路徑為 font/xxx0001.ttf ,再來就由<h1>填入剛剛訂定的名稱字型,就可改變字體,<p>的設定亦同,來看結果:
2012-10-18_121940  
看到字型與原本設定的字型已有改變,這對有字體上的要求的設計者,到是一個福音;不過當你設定過多的字型,勢必要去讀取資料檔案,相對來說,當你讀取的資料很多的情況下,也會影響網頁讀取的時間,對於分秒必爭的現代人,可能不是件好事,這個可能要適度就好,可別放太多字型在裡面,影響了內容。

2012年10月17日 星期三

工作忙碌啊~~~

最近都在忙著做平面處理的工作~~~

客戶都趕著交平面圖~~~

 忙~~~~~~~~


2012年10月15日 星期一

如何美化網頁文字(12)-[text-shadow]將文字加入陰影


0000標題023
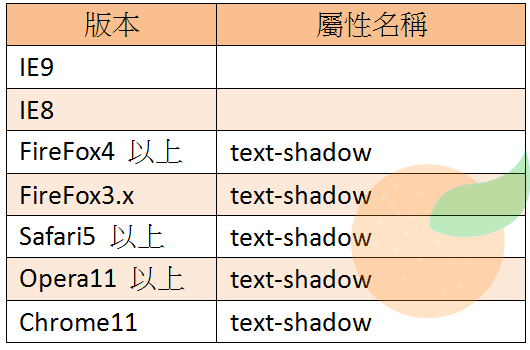
再來介紹的就比較常用了,我們經常在使用文字想要加上該文字的陰影,都必須用圖形來替代,現在新版的css3 的語法中,有一個指令可以將該文字都變成了有陰影的文字,但是該語法為css3的語法,所以就有了相容性的問題,也就是說,如果使用者的瀏覽器版本較舊,就看不出效果了!所以,也是要注意的。
可使用的瀏覽器版本:
2012-10-11_173929
來寫段html 吧!
<!doctype html>
<html>
<head>
<metacharset="utf-8">
<title>魚和橙</title>
</head>
<body>
<h1>text-shadow</h1>
<p id="line1">魚和橙的結合1</p>
<p id="line2">魚和橙的結合2</p>
<p id="line3">魚和橙的結合3</p>
<p id="line4">魚和橙的結合4</p>
</body>
</html>
 text-shadow 有3個參數值:
屬性參數順序說明
第1個值陰影效果的水平距離,正值為右,負值為左。
第2個值陰影效果的垂直距離,正值為下,負值為上。
第3個值陰影模糊的作用距離[不可為負值]。
我們加入css參數來看看吧!
<style type="text/css">
#line1 {
    text-shadow:none;
}
#line2 {
    text-shadow:5px 0px;

}
#line3 {
    text-shadow:0px 5px;

}
#line4 {
    text-shadow:4px 4px 2px;

}
來看看輸出結果吧!
 2012-10-11_175544  
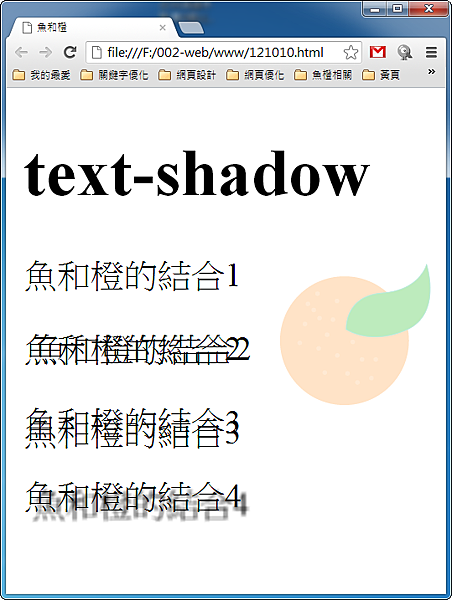
該結果可以發現文字會朝著你所設定的方向而改變,而在#line4 因為加入第三個參數,而產生了模糊陰影。
再來,我們有時候想讓陰影有顏色,並不是單一黑色的時候,也可以經由這個,來改變,更可以加入複合的陰影,只要用 "," 來分別就可以了。
我們在相同的html 裡,再加入#line5 和 #line6 因為相同的輸入,就不說明html 的內容了,來看看結果吧!
再修改css吧!
<style type="text/css">
#line1 {
    text-shadow:none;
}
#line2 {
    text-shadow:5px 0px;

}
#line3 {
    text-shadow:0px 5px;

}
#line4 {
    text-shadow:4px 4px 2px;

}
#line5 {
    text-shadow:red 4px 4px 1px;

}
#line6 {
    text-shadow:yellow 1px 1px 0px, gray 8px 8px 3px;

}
</style>
直接來看看輸出結果!
2012-10-11_180745   
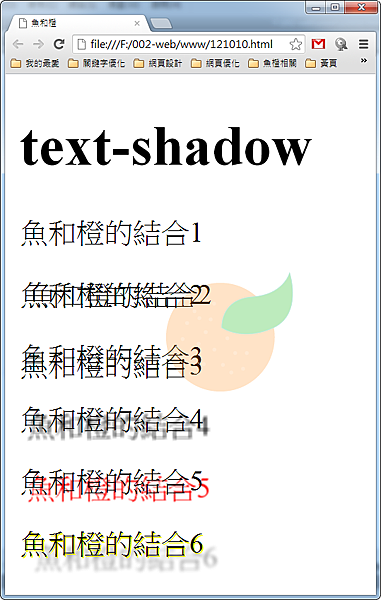
在第5個和第六個就可以依你所設定的方式更改你的陰影顏色,在第6個更能加入複合的陰影,看你想加幾個,就多寫幾段即可。
而當你有陰影文字的須求,這是一個很棒的選擇,因為,你無須再使用其他的圖形軟體,就可達成該目地;有時候,文字設定了陰影,會讓你的網頁的文字,有時看起來較為有質感。
最重要的,因為他是純文字,搜尋機器人會更容易找到你的網頁(和圖片相比的話)

2012年10月12日 星期五

如何美化網頁文字(10)-[text-align]置中、靠左、靠右


0000標題021
改變文章段落對齊,是文章中常用的方式,可以利用text-align 來做設定,他的屬性有 left、right、justify、center,分別為靠左、靠右、左右對齊、置中。
寫段html 吧!
<!doctype html>
<html>
<head>
<meta charset="utf-8">
<title>魚和橙</title>
</head>
<body>
<h1>text-align</h1>
<p id="line1">The results of a survey <strong>keyword</strong> Friday showed <span>that 70 percent</span> of local <em>salaried employees</em> are hesitant(1) about getting married, citing insufficient(2) savings and job instability as the reasons.魚 橙</p>
<p id="line2">The results of a survey <strong>keyword</strong> Friday showed <span>that 70 percent</span> of local <em>salaried employees</em> are hesitant(1) about getting married, citing insufficient(2) savings and job instability as the reasons.魚 橙</p>
<p id="line3"> The results of a survey <strong>keyword</strong> Friday showed <span>that 70 percent</span> of local <em>salaried employees</em> are hesitant(1) about getting married, citing insufficient(2) savings and job instability as the reasons.魚 橙</p>
<p id="line4"> The results of a survey <strong>keyword</strong> Friday showed <span>that 70 percent</span> of local <em>salaried employees</em> are hesitant(1) about getting married, citing insufficient(2) savings and job instability as the reasons.魚 橙</p>
</body>
</html>
 先來看輸出吧!
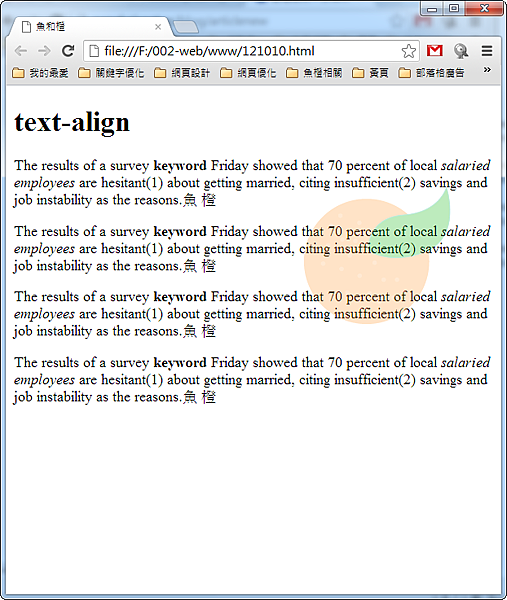
2012-10-10_131210  
加入css吧!!
<style type="text/css">
#line1 {
    text-align: left;
    background-color: #F00;
}
#line2 {
    text-align: right;
    background-color: #999;
}
#line3 {
    text-align: center;
    background-color: #0F0;
}
#line4 {
    text-align: justify;
    background-color: #0FF;
}
</style>
看看結果吧!
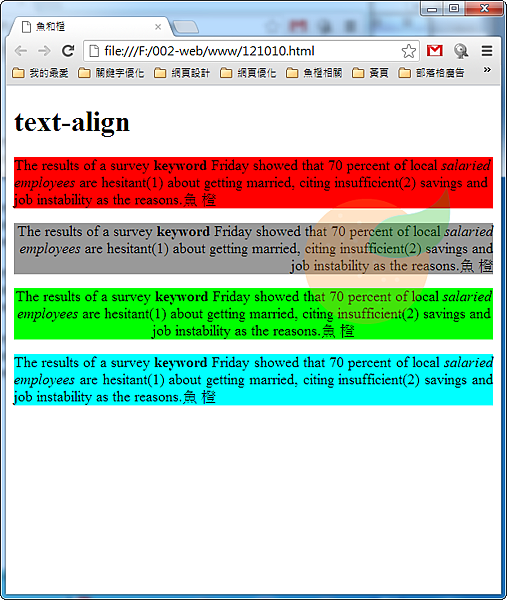
2012-10-10_131401  
前面兩行看不出結果,在最後一行,可以看到設定的結果,加入這樣的css就可改變對齊方式。
而使用 justify 他在用於列印程式(word 等 )是很適合使用的,而在網頁文字的使用上,他的使用效果並不是很明顯,所以通常僅使用left right center 的屬性。
而在正式使用上,文本對齊方向還是都用靠左(預設 ),所以此功能其實不多用,因為靠左靠右,有時候是用區塊來排版,較為常用。

2012年10月11日 星期四

如何美化網頁文字(9)-[line-height]改變文字的行距


0000標題020  
我們有時候打文章時,每個文章的行距有時設置的過於緊,會造成閱讀者看得很不舒服,所以,我們會想把行距拉大一點,讓閱讀者能看得舒服一點,這時候就要利用line-height 的屬性,來讓句子行距增加或減少。
先來寫個html吧!
<!doctype html>
<html>
<head>
<meta charset="utf-8">
<title>魚和橙</title>
</head>
<body>
<h1>line-height</h1>
<p id="line1">The results of a survey <strong>keyword</strong> Friday showed <span>that 70 percent</span> of local <em>salaried employees</em> are hesitant(1) about getting married, citing insufficient(2) savings and job instability as the reasons.魚 橙</p>
<p id="line2">The results of a survey <strong>keyword</strong> Friday showed <span>that 70 percent</span> of local <em>salaried employees</em> are hesitant(1) about getting married, citing insufficient(2) savings and job instability as the reasons.魚 橙</p>
<p id="line3"> The results of a survey <strong>keyword</strong> Friday showed <span>that 70 percent</span> of local <em>salaried employees</em> are hesitant(1) about getting married, citing insufficient(2) savings and job instability as the reasons.魚 橙</p>
<p id="line4"> The results of a survey <strong>keyword</strong> Friday showed <span>that 70 percent</span> of local <em>salaried employees</em> are hesitant(1) about getting married, citing insufficient(2) savings and job instability as the reasons.魚 橙</p>
</body>
</html>
看看還沒改變前的樣子吧!
     
將css 也加進來吧!
<style type="text/css">
#line1 {
    line-height: 0.5em;
    background-color: #CF0;
}
#line2 {
    line-height: 1em;
    background-color: #CCC;
}
#line3 {
    line-height: 2em;
    background-color: #FFC;
}
#line4 {
    line-height: 3em;
    background-color: #9FC;
}
</style>
將#line1~4 依序line-height設置 0.5em、1em、2em、3em ,為了方便辨識,在每個都加了底色!來看看輸出結果吧!
   
可以看到#line1的部份,設置0.5em會看到行距設了過小,他的字體都重壘在一起了,而依序下來,就會隨著數字變大,行距就會更大了。
一般而言,建議設置行距以%(百分比)或em (行長單位)為優,也可設定(px.pt)像素單位,如果當你的文字改變時,像素單位並無法隨之變動,而百分比或行長單位的方式,會隨你設定的文字大小,隨之變動,而就會減少文字重壘的狀況,特別在修改主體css時,更是要注意!