之前,橙都是以全部的邊框來設定,當然,有時候,我們不需要四個邊都需要設定,只須要一個邊來表示時,此時,我們可以指定我們要的方向來設定,無須四個邊都要設定。
而設定的方式,僅須要以 top、bottom、left、right 來分別,再加上屬性即可,而我們先設定基本要改的html 吧!
<!doctype html>
<html>
<head>
<metacharset="utf-8">
<title>魚和橙的結合</title>
</head>

<body>
<p id="bord1">border1</p>
<p id="bord2">border2</p>
<p id="bord3">border3</p>
<p id="bord4">border4</p>
</body>
</html>
此例和上篇是一樣的,而我們在#bord1~#border4 中,各別加入上下左右的條件,分別改變其id的邊框顏色、樣式及粗細,橙子將css 加入吧!
<style type="text/css">
p {
    display: block;
    width: 150px;
}
#bord1 {
    border-top-color:red;
    border-top-style:dashed;
    border-top-width:1px;
}
#bord2 {
    border-bottom-width: 1px;
    border-bottom-color: gray;
    border-bottom-style: double;
}
#bord3 {
    border-left-width: thin;
    border-left-style: double;
    border-left-color: blue;
}
#bord4 {
    border-right-width: thick;
    border-right-style: dotted;
    border-right-color: black;
}
</style>
橙子將css 加入了一些條件,橙將<p>標籤中設立了寬度為150px,容器屬性為block(區塊)。
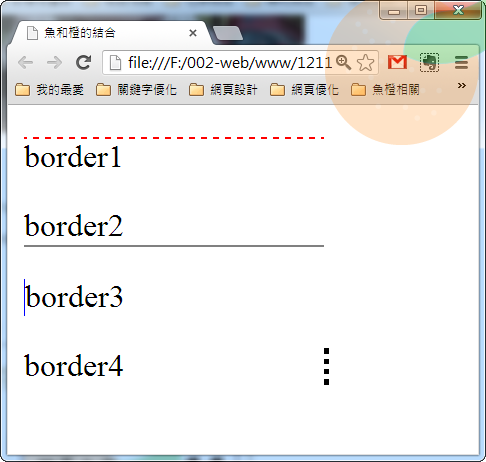
而在bord1 加入了border-top-color 為紅色,border-top-style 為虛線,border-top-style為1px寬,各位看下去,其實設定的方式就是將前幾篇所說的,中間加入了方向名詞,即可產生你要的效果。
所以,#bord2~#bord4 就分別修改下、左、右的屬性,我們就來看看,我們修改的結果吧!

是不是就改成你要結果的呢?可以試試看喔!
沒有留言:
張貼留言